Essential Maintenance Checklist for Long-Lasting Chicken Barns
To guarantee your chicken barn’s longevity, you need a thorough maintenance checklist. Start with structural inspections: inspect the foundation for cracks, verify the integrity of posts and beams, and maintain a solid roof with proper drainage. For ventilation and air quality, monitor CO2 levels, clean fans and vents regularly, and adjust ventilation settings based on air quality readings. Check electrical systems daily, verifying all lights and components are functioning, and perform regular plumbing inspections to prevent water system malfunctions. Daily checks on feed and water systems are vital, as are biosecurity measures like secure entry systems and pest control. By following these steps, you’ll be well on your way to maintaining a healthy and efficient chicken barn; continuing with these practices will help you address even more critical aspects of barn maintenance.
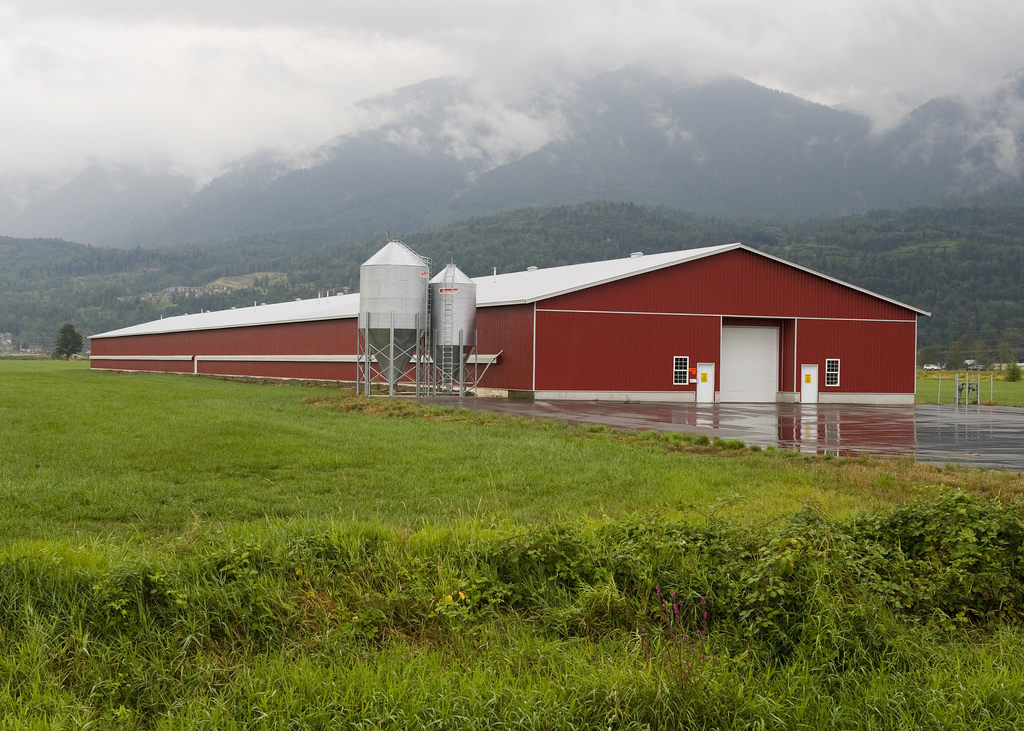
Section 1: Structural Maintenance for Longevity
To guarantee the longevity and structural integrity of your chicken barn, it is imperative to conduct regular inspections. Just as Twin Maple Construction emphasizes attention to detail in their building projects, you should apply the same rigor to maintaining your chicken barn.
Regular Inspections and Repairs
Here are some key points to focus on:
- Check the Foundation and Floors Make sure the foundation is solid and the floors are free from rot or damage. Concrete floors, like those recommended for coop flooring, are ideal as they are easy to clean and prevent pests from digging underneath.
- Inspect the Roof The roof is critical for protecting your chickens from the elements. Check for loose or damaged panels, and make sure of proper drainage to prevent water from seeping into the structure. A steeper roof pitch, similar to recommendations for pole barns, aids in better water runoff and snow shedding.
- Examine Posts and Beams Regularly inspect the posts and beams for signs of decay or damage. High-quality, pressure-treated lumber can resist decay and insect damage, but it still needs periodic checks.
- Maintain Ventilation Proper ventilation is essential to prevent moisture buildup, which can lead to mold and mildew. Make sure vents are clear, and consider using hardware cloth for windows to maintain airflow while keeping predators out.
Section 2: Ventilation and Air Quality Maintenance
Ensuring proper ventilation and air quality in your chicken barn is essential for the health and well-being of your flock. This involves maintaining what is known as minimum ventilation, which is the vital ventilation required to refresh the air and maintain a healthy climate.
To measure minimum ventilation, you need to monitor the levels of CO2 in the barn, aiming for levels between 2000 and 3000 parts per million (ppm). Below 2000 ppm indicates excessive ventilation, while above 3000 ppm suggests inadequate ventilation.
Several factors influence minimum ventilation, including animal weight, outside temperature, humidity, and inside heating. Make sure that your ventilation system is set up correctly, with sufficient static pressure to mix incoming cool air with the warm air above the poultry. This prevents cold air from directly cooling the chickens and causing condensation on wet litter.
Regular maintenance is critical. Check and clean fan shutters after every flock, and inspect belts and other components to make sure they are in good working condition. Block the correct vents during brooding to make sure ventilation air enters the brooding chamber first, and adjust ventilation run times as necessary to compensate for any inefficiencies.
Proper inlet door openings are essential for bird comfort, moisture removal, and uniform floor temperatures. Adjust these openings routinely and maintain the ventilation fans, which cycle frequently and operate under high static pressure.
Section 3: Electrical and Lighting System Upkeep
Effective management of your chicken barn’s electrical and lighting systems is essential for the safety, health, and productivity of your flock. Here are some key points to focus on for top-notch upkeep:
Electrical and Lighting System Upkeep
Daily Checks
- Verify that all lights are functioning properly, especially during the winter months when supplemental lighting is critical for maintaining egg production. LEDs and barn lights are excellent choices due to their efficiency and durability.
Regular Maintenance
- Dust light fixtures regularly to prevent dust and cobwebs from gathering, which can dull the light and create a fire hazard. Clean electrical outlets and switches as well to maintain safety and functionality.
Safety Precautions
- Inspect all electrical wiring and components for signs of wear or damage. Replace any faulty or worn-out parts immediately to prevent electrical shocks or fires.
Automated Systems
- Consider installing timers or automated systems to control the lighting. This guarantees that the lights turn on and off at specific times, mimicking natural daylight and supporting the chickens’ circadian rhythms.
Section 4: Water Supply and Plumbing Inspections
Maintaining a reliable water supply and conducting regular plumbing inspections are essential for the health and well-being of your chickens. Start by preparing a detailed checklist to guarantee all aspects of your water system are inspected frequently. Check the drinkers daily for leaks, malfunctions, or sagging areas, and make sure the drinker lines are level and free of pinch points.
Regularly inspect and replace filters in the water system, including those in the water tank and entrance areas, to prevent clogged filters which can reduce water flow and pressure. Check the well head and source water system monthly, or after unusual events like heavy rain or flooding, to guarantee the water source is not contaminated. Test the pH level after filters to detect any changes that might indicate issues within the system.
Flush the waterlines once or twice a flock for meat birds and once a month for layers/breeders, using a cleaner between flocks if necessary. Proper flushing, especially during high heat periods, is vital to guarantee all birds receive cool, fresh water.
Section 5: Feeding Systems and Storage Maintenance
How often do you inspect and maintain the feeding systems and storage areas in your chicken barn? Regular maintenance of these components is vital for the health and productivity of your chickens.
To guarantee your feeding systems are operating at their best, follow these steps:
1. Check for Feed Leaks and Efficiency
Inspect your feeding systems daily to identify any feed leaks or disruptions. Guarantee that every bird has unobstructed access to the feeders and that the feed is distributed evenly. Adjust the height of the feeders according to the age and size of your chickens.
2. Clean Feeders and Water Containers
Clean out feeders and water containers daily to prevent the buildup of bacteria and contaminants. Empty out remaining bits of food to keep the feeders clean and free of debris. This routine helps in maintaining the health of your flock.
3. Monitor and Adjust Feeder Settings
Regularly monitor the performance of your feeding system. Fine-tune the settings as necessary to prevent excessive feed wastage. For example, adjust the feed pans to the ideal height to match the growth stage of your chickens.
4. Ensure Proper Storage
Keep the storage areas organized and clean. Use designated spaces for storing bedding, tools, and supplies. Regularly clean and disinfect these areas to maintain a healthy environment for your chickens.
Section 6: Biosecurity and Pest Control Measures
To guarantee the health and security of your chicken flock, implementing robust biosecurity and pest control measures is crucial.
Start by designing and maintaining a secure entry system for your chicken barn. Create three distinct zones at the entrance: a ‘dirty zone’ for external access, a transitional area for changing footwear and donning coveralls, and a ‘clean zone’ for the interior of the barn. See to it that these zones are separated by physical barriers and demarcations. Automatic doors with springs can prevent unwanted entry and minimize the influx of flies and other pests. Install a lock system that requires a code, and have visitors supervised as they follow biosecurity protocols, including boot changes and handwashing.
Regularly sanitize the barn, focusing on areas that are difficult to clean, such as equipment that cannot be washed with water, which may require fumigation for thorough disinfection. Maintain a proper drainage system to prevent waterlogging, and see to it that the barn is secure against rodents and wild birds, which can be disease vectors.
Implement a pest management plan that includes moisture management, sanitation, and manure removal. Use residual insecticides, manure drying fans, and biological controls like parasitoids to manage fly populations. Regularly inspect for leaking waterers and maintain clean conditions to prevent pest infestations.
Section 7: Bedding and Litter Management
When it comes to managing the bedding and litter in your chicken barn, regular and thorough maintenance is paramount to guarantee a clean, healthy, and comfortable environment for your flock.
Key Maintenance Tasks
- Select Appropriate Bedding Materials: Use dry, absorbent materials like rice hulls, straw, wood chips, or peanut shells. These materials help keep the ground dry and soft for the chickens. Avoid materials such as hay, cedar shavings, and black walnut due to their potential to generate ammonia or harmful oils.
- Control Moisture Content: Utilize advanced heating and ventilation systems to keep the bedding dry. Regularly inspect the litter to verify it is ‘friable’ and not too cakey or moist. High moisture levels can lead to health issues and must be addressed promptly.
- Implement the Deep Litter Method: Consider the deep litter method, which involves maintaining a thick layer of bedding that decomposes over time. This method reduces the need for frequent cleaning, produces compost, and maintains a sanitary environment. Verify that the bedding is deep enough (4-12 inches) to allow for effective decomposition and oxygen circulation.
- Reuse and Sanitize Litter: Unless there is a disease or biosecurity issue, litter can be reused between flocks. Remove caked or wet areas, stir the old litter, and add a fresh layer on top. The process of windrowing can pasteurize the litter, killing pathogens and making it safe for reuse.
Section 8: Health and Safety System Maintenance
Maintaining a clean and healthy environment in your chicken barn is not just about managing the bedding and litter; it also involves a systematic approach to health and safety. To guarantee the well-being of your flock, you must implement and regularly maintain a robust biosecurity program.
Start by guaranteeing all entry points to the barn are sealed to prevent rodents and wild birds from entering. Install bait stations along the walls and in areas of high rodent activity, checking them weekly and replenishing bait as needed. Maintain a clean perimeter around the barn by keeping a 1 to 2 meter wide strip of concrete, gravel, or neatly cut grass free from waste, weeds, and unused equipment.
Implement a strict access control system, including a single access gate with “no trespassing” signs and a fumigation station for vehicles. Guarantee farm personnel do not have contact with other poultry or wild birds and comply with clothing and footwear protocols. Regularly clean and disinfect footbaths, and mandate showers for all visitors, especially if they have been exposed to risk situations.
Daily routines should include washing and disinfecting hands before starting work, after breaks, and after using the toilets. Periodically check and maintain all areas of the barn, including air inlets, extractors, egg conveyors, litter pits, and drains. This proactive approach will substantially reduce the risk of disease and guarantee a healthy environment for your chickens.
Section 9: Manure Management and Waste Disposal
Effective manure management and waste disposal are essential for keeping your chicken barn clean, reducing the risk of disease, and ensuring the health and well-being of your flock.
Daily removal of manure from the coop is critical. Use a manure box or a designated area where the bulk of the manure accumulates, making it easier to clean each morning. This practice helps minimize the presence of flies, mice, and rodents, and reduces unpleasant odors.
Here are some key steps to manage chicken manure effectively:
1. Composting
Compost the manure to turn it into a valuable fertilizer. Chicken manure is high in nitrogen and needs time to age before it can be safely added to your soil. Composting kills pathogens and weed seeds, producing a nutrient-rich fertilizer.
2. Regular Turning
Ensure the compost pile is turned regularly, especially after the temperature reaches 65°C. This process helps in breaking down the manure efficiently and prevents the growth of harmful bacteria.
3. Proper Storage
Store the composted manure in a well-ventilated area to prevent moisture buildup and reduce odors. This also helps in retaining the fertilizer’s potency[1].
4. Conversion to Fertilizer
Consider converting the manure into granular or powder fertilizer for easier use and storage. This can be done through various production lines that cater to different scales of operation, from small to large.
Section 10: Recordkeeping and Monitoring Systems
After verifying your chicken barn’s manure is managed and composted effectively, it’s time to focus on the systematic tracking and monitoring of your coop’s conditions and your chickens’ health.
To maintain ideal conditions, you need a robust monitoring system. This involves installing various sensors to track key parameters such as temperature, humidity, ammonia levels, and CO2 concentrations. Temperature sensors, like DHT11 and DHT22, are essential for controlling heaters and guaranteeing the barn’s temperature remains within a safe range for your chickens.
Humidity sensors are equally important, as they help prevent diseases that thrive in damp environments. Ammonia and CO2 sensors are critical for monitoring air quality, which directly impacts the health and development of your flock. Static pressure sensors help manage air velocity and energy efficiency by controlling inlets, tunnel doors, and exhaust fans.
These sensors should be connected to a central controller or a cloud-based dashboard, allowing you to monitor conditions in real-time and receive instant alerts for any abnormalities. This system guarantees you can take prompt action to maintain a healthy and efficient environment for your chickens.
Regularly reviewing the data from these sensors helps you identify trends, enhance your farm’s operations, and make informed decisions to improve the overall health and productivity of your flock. Keeping detailed records of these metrics is fundamental for long-term farm management and can substantially enhance your ability to respond to potential issues proactively.
To guarantee the long-term health and productivity of your chickens, a thorough maintenance checklist for your chicken barn is essential. Regular maintenance not only confirms the well-being of your flock but also extends the life of the coop itself.
.